2012年9月30日 星期日

軟體工程學習資源-pdf

最近在準備下個月的TQC考試
這次考的科目很特別-軟體開發知識
很... 覺得是蠻特別的科目,雖然我覺得我應該考不過 ,
呵呵,這是外科系轉資訊相關行業的悲哀嗎....
總覺得有了解不完的事情,放眼望去就是無底

不過有本書我覺得是必看,原本想說要自己整理筆記,但是有找到更好的。
李允中教授的軟體工程
pdf可以參考這個網址:

超完整的軟體工程講義
提供: 國立中央大學 李允中教授
資料來源 : 
http://chigo-studio.blogspot.tw/2011/04/blog-post_16.html

2012年9月26日 星期三

使用PHP+jquery+ajax製作簡易自動登入Loign功能

Using PHP + jquery + ajax 
making simple automatic Login Loign function
一直試,
一直試 .....
最近一直很好奇jquery的ajax是怎麼樣做出來的,突然想到一直很想做這個(登入的loading功能),看到那個loading的gif在那裏轉,感覺真是體驗度加分,不過還有很多要改進的地方,對於ajax我還是個菜鳥咧xd,現在只有做出正確登出,正確登入,驗證有無填寫欄位的功能,若有辦法再加強,會再補新版本。

版本說明:
v1.0可正確登入,可登出 沒有註冊功能,所以必須從資料庫建。


Demo檔下載
https://github.com/winwu/AjaxPractice-Login


檔案說明:(抱歉還有一個style.css檔沒畫到)
資料庫欄位說明:
資料庫名為:login_test
資料表為:user

-- 表的結構 `user`
--

CREATE TABLE IF NOT EXISTS `user` (
  `id` int(11) NOT NULL AUTO_INCREMENT,
  `userid` varchar(11) COLLATE utf8_unicode_ci NOT NULL,
  `password` int(11) NOT NULL,
  `regitster_date` datetime NOT NULL,
  `first_name` char(5) COLLATE utf8_unicode_ci NOT NULL,
  `last_name` char(10) COLLATE utf8_unicode_ci NOT NULL,
  PRIMARY KEY (`id`)
) ENGINE=InnoDB  DEFAULT CHARSET=utf8 COLLATE=utf8_unicode_ci AUTO_INCREMENT=3 ;

--
-- 轉存資料表中的資料 `user`
--

INSERT INTO `user` (`id`, `userid`, `password`, `regitster_date`, `first_name`, `last_name`) VALUES
(1, 'wwutw0925', 1234567, '2012-09-25 00:00:00', 'win', 'wu'),
(2, 'wwutw09251', 1234567, '2012-09-25 00:00:00', 'win', 'wu');


畫面說明:
這是首頁,需輸入ID跟password,若有其一錯誤或未填寫,皆會有error message
可以test/1234567 測試
這是填寫資料後登入的畫面,此時會看到loading在那裏轉啊轉~此時資料已經被帶到login_chk.php去執行,比對資料是否與資料庫吻合。

若資料吻合就會寫登入成功。

但下登出後。

這個畫面是驗證的畫面,若欄位沒有正確填寫,就會出現灰色那一塊。

這裡是code:
db_conn.php
<?php
mysql_connect('localhost','root','root');
mysql_select_db('login_test');
mysql_query("SER NAMES 'utf8'");
//set taiwan zone
date_default_timezone_set('Asia/Taipei');
?>
index.php
<?php
include('db_conn.php');  //include db connection 將來可能會用到
?>
<!DOCTYPE HTML>
<html>
<head>
    <meta charset="UTF-8">
    <title>welcome!</title>
    <script src="http://code.jquery.com/jquery-latest.js"></script>
    <link rel="stylesheet" href="style.css">
</head>
<body>
<script language="javascript">
$(function(){
    $('#submit').mouseover(function(){$(this).css({'background':'black'})});
    $('#submit').mouseout(function(){$(this).css({'background':'#5A2626'})});
});


function userlogin(){
    <!--先取得欄位值-->
    var user_name = $('#user_name').val();
    var user_password = $('#user_password').val();
    <!--判斷有無正確填寫-->
    if(user_name=="" && user_password==""){
        $('#error_msg').text('Please enter your ID & password');
        return false;
    }
    if(user_name==""){
        $('#error_msg').text('Please enter your ID');
        $('#user_name').focus();
        return false;
    }else if(user_password==""){
        $('#error_msg').text('Please enter your password');
        $('#user_password').focus();
        return false;
    };
//真正的ajax動作從這裡開始
    $.ajax({
        url:"login_chk.php",
        data:"user_name="+user_name+"&user_password="+user_password,
        type : "POST",
        beforeSend:function(){
            $('#loading_div').show(); 
            //beforeSend 發送請求之前會執行的函式
        },
        success:function(msg){
            if(msg =="success"){
                $('#login_showname').text('Welcome!'+user_name);
                $('#login_success').text('You have successfully login!');
                $('#login_success').fadeIn();
                $('#error_msg').hide();
                $('#user_login').hide();     
                $('#user_logout').fadeIn();
                //如果成功登入,就不需要再出現登入表單,而出現登出表單    
            }else
            {    
                $('#error_msg').show();
                $('#error_msg').html('Please Login again,<br/>沒有此用戶或密碼不正確');
            }
        },
        error:function(xhr){
            alert('Ajax request 發生錯誤');
        },
        complete:function(){
            $('#loading_div').hide();
            //$('#user_login').hide();         
            //complete請求完成實執行的函式,不管是success或是error
        }
    });    
};
function userlogout(){
    $.ajax({
        url:"logout.php",
        type : "POST",
        beforeSend:function(){
            $('#loadingout_div').show(); 
            $('#login_success').hide();
            $('#error_msg').text('Logout...please wait..');
            $('#user_logout').hide();
            //beforeSend 發送請求之前會執行的函式
        },
        success:function(msg){
            if(msg=="success"){
                $('#user_login').fadeIn();     
            }else
            {    
                $('#error_msg').html('請在登出一次');
            }
        },
        error:function(xhr){
            alert('Ajax request 發生錯誤');
        },
        complete:function(){
            $('#loadingout_div').hide();
            $('#user_login').fadeIn();     
        }
    });    
}
</script>
<div id="login_block">
    <form id="user_login" method="POST">
    <table id="login_table">
        <tr>
          <td>
           <label>ID:</label><input type="text" name="user_name" id="user_name"/><br/> 
           <label>Password:</label><input type="password" name="user_password" id="user_password"/><br/>
           <input type='button' id='submit' value='Login' onclick='userlogin();'/> 
          </td>
        </tr>
    </table>
    </form>
    <div id="error_msg"></div>

    <form id="user_logout" method="POST" style="display:none;">
    <table id="login_table_out">
        <tr>
          <td>
            <span id="login_showname">
            <!--放登入狀態-->
            </span>
           <input type='button' id='submit2' value='Logout' onclick='userlogout();' />
          </td>
        </tr>
    </table>
    </form>
    
    
    <div id="loading_div" style="display:none">
        <img src="ajax_loader.gif"><br/>Login...please wait
    </div>
    <div id="loadingout_div" style="display:none">
        <img src="ajax_loader.gif"><br/>Logout...please wait
    </div>
    <div id="login_success" style="display:none;">
    <!--放you are successfully login-->
    </div>
</div>
<div id="ft">win design it @ 2012 </div>
</body>
</html>

login_chk.php
<?php
session_start();
/* -------------------------- */
/* Check username & password  */
/* -------------------------- */
include('db_conn.php');
sleep(1); 
$userid = isset($_POST["user_name"]) ? $_POST["user_name"] : $_GET["user_name"]; 
$password = isset($_POST["user_password"]) ? $_POST["user_password"] : $_GET["user_password"]; 
$sql = 'SELECT * FROM user WHERE userid = "'.$userid.'" and password="'.$password.'"';
$result = mysql_query($sql);
$row = mysql_fetch_assoc($result);
$record_count = mysql_num_rows($result); 
if($record_count<1){
//無資料回傳no data
    echo 'no data';
}else{
//若有這筆資料則回傳success
    $_SESSION['user_name'] = $userid;
    echo 'success';
    //echo $row['first_name'].$row['last_name'];    for debug use
} 
?>

logout.php
<?php 
//unset($_SEEEION['user_name']);
sleep(2);
echo 'success';
?>

style.css
/*author : win*/
html{
    background:url(./img/bg.jpg) no-repeat center center; min-height:100%;
    background-size:cover;
}
#login_block{
    background: url(./img/lo_bg.png) no-repeat;
    width: 317px;
    height: 400px;
    margin: 0px auto;
    margin-top: 50px;
    padding: 82px 10px 10px 51px;
    font-family: arial
}
#submit,
#submit2{
    background: #5A2626;
    border: 0px;
    color: white;
    padding: 5px 10px;
    width: 243px;
    margin-top: 10px;
    font-size: 18px;
    -webkit-border-radius: 5px;
    -moz-border-radius: 5px;
    border-radius: 5px;cursor: pointer;
}
#error_msg{
    width: 224px;
    background: #525150;
    display: block;
    color: white;
    padding: 0px 10px;
    font-size: 12px;
    margin: 1px;
    line-height: 26px;
    -webkit-border-radius: 5px;
    -moz-border-radius: 5px;
    border-radius: 5px;
}
input[type=text],
input[type=password]{
    border: 1px solid white;
    -webkit-border-radius: 5px;
    -moz-border-radius: 5px;
    border-radius: 5px;
    padding: 5px;
    -moz-box-shadow: 3px 3px 5px #000000;
    -webkit-box-shadow: 2px 2px 3px #424242;
    box-shadow: 2px 2px 2px #5A5A5A;width: 231px;
}
label{
    width: 74px;
    display: block;
    padding: 3px 3px;
}
#loading_div,
#login_success,
#loadingout_div{
    text-align: center;
    width: 252px;
    margin-top: 10px;
}
#login_success{width: 269px;}
#login_showname{
    text-align: center;
    margin: 0 auto;
    display: block;
}
#ft{
    font-family: arial;
    font-size: 10px;
    text-align: center;
}
今天實在睏了,有機會會再好好整理這些code....
然後持續改良他,使他更好用..

上傳到空間: 
http://yiying2.ueuo.com/my_login2/index.php  可以test/1234567 測試

這個登入畫面的練習重點在於,不想讓登入執行過程中有轉頁的感覺,而輸入的帳號密碼,透過ajax傳送到login_chk.php去動作,若資料正確無誤,則會echo "success"傳回index.php,讓首頁得知可以做正確登入後的動作(顯示你已成功登入的畫面)。

另外session跟sql injection都未做。

再來是ajax的動作,當使用者在首頁填入資料後按下Login的按鈕後,就會執行javascript的userlogin的這個function():

   function userlogin(){
      
      //do something
      前面幾行我先驗證是否有接收到資料,若沒有就將錯誤訊息傳到#error_msg 這塊div
      並且return false,後面不需要再執行。
     

     $.ajax({
      //真正的送資料從這裡開始
           

    });
  }

為甚麼loading的那張圖片會轉=>
要讓loading的圖片有幾秒的時間轉動,我這邊做了兩件事
1)  寫在$.ajax({}) 裡面的
               beforeSend: function(){
$('#loading_div').show(); 
},
     就是在做這件動作,beforeSend是發送請求之前會執行的函式
     將loading的gif圖檔放在一個div區塊內,預設css的display為none.
     無論如何,預設是不會有動作的... 除非按下登入或登出,我們才讓這個動畫顯示出來,示
     意使用者資料正在讀取,具有提示的作用。


2)在login_chk.php sleep(2) 讓他睡兩秒再執行

3)當ajax request送出到完成的順序是
beforesend->success/error->complete

請參考:http://blog.ericsk.org/archives/839  Query 學習心得筆記 (5) – Ajax (下) 
Login using Ajax and PHP http://woork.blogspot.tw/2007/10/login-using-ajax-and-php.html
jQuery+Ajax+PHP登錄實例 http://fxc86.blog.hexun.com.tw/51421105_d.html


2012年9月20日 星期四

smallwinwin通訊錄mockup

小winwin通訊錄 - mockup v1
準備拿來改造我的小winwin通訊錄用的
但前提是先把jquery UI搞懂。

2012年9月19日 星期三

使用Fedora以超級使用者(root)登入

前幾天第一次使用virtualbox掛載虛擬Linux系統(目前使用Fedora),
一直無法使用超級管理員登入,倒是一直被系統說驗證失敗,
心理冒出一句話: ㄝ....我不是管理員嗎 = = 


後來看書得到的結果是,可直接下指令登入超級管理員可下 :
su -
(- 是減號),這指令是直接以root登入


接下來只要輸入root的密碼就可以了。


當提示符號從$ 變成 #時,就表示成功以超級管理員的身分在使用了。

比較進階的方法是:(但使用這個進階方法要先以root登入,否則沒有權限改到檔案,這個方法有好有壞拉->我認為是這樣...)

1)以root登入

2)到這個目錄底下  /etc/pam.d


3)開啟gdm-password  ,並註解掉這行(前面加#),然後存檔。


4)接下來切換身分登入看看


成功,看到這畫面表示....但他告訴你並不建議你以超級使用者登入,還好我是在虛擬裝置下才敢這樣玩,若是玩真的就不要這樣做了。

2012年9月18日 星期二

打開codeigniter卻出現500 Internal Server Error的問題

剛剛遇到一個問題就是,將CI的專案從A電腦appserv複製到B電腦的appserv
(config裡面的database.php都設定好了)
卻遇到的傻眼問題:

後來上網查了一下,必須這樣做...

1) 找到apache的這個目錄 :
    C:\AppServ\Apache2.2\conf

2)然後開啟這個檔案:  httpd.conf
   在約略196行的地方(請找到這行)
   #LoadModule rewrite_module modules/mod_rewrite.so
   然後將前面的註解(#)拿掉-> 存檔,需使得modules可rewrite,就可以正常執行
 

3)restart Apache !

4)登登登登~ 成功看到網站!

另一種情況是,.htaccess沒設定好
請看此國外教學:http://stackoverflow.com/questions/6674689/codeigniter-500-internal-server-error

解決phpmyadmin頁面呈現空白的問題


(OS:這個問題終於有解了.....)
前天發生的情況就是,不知道為甚麼phpmyadmin無法登入
問題描述:
1)即使登入也無法正常看到phpmyadmin頁面
2)與瀏覽器無關
3)重灌也沒用
4)也不是skype佔到那個port

後來找到的解答是 : 
開啟
C:\Windows\System32\drivers\etc\hosts
然後自己加上一行 127.0.0.1   localhost 存檔後就可正常執行。
若原本有這一行而是被註解掉的話,將註解拿掉存檔後即可。


重新連結127.0.0.1/phpmyadmin 正常了!


2012年9月16日 星期日

TQC Windows 7 Professional專業級考後心得..


我不知道為甚麼我要考這張.....

只是因為剛好有書所以去考了....Orz

果然不能做沒興趣的事情..

雖然這篇沒什麼重點...

但win7考起來真的是我考過最痛苦的TQC,毫無成就感阿.....

雖然也因此認識了不少平常不知道的win7功能,但 ... 以後也不會常用... xd 哈~

2012年9月13日 星期四

學codeigniter的資源包(win私藏)

 1) codeigniter官網使用手冊
    官網使用手冊,還好我覺得很重要的部分都有中文可看。當入門時都看這個。

 2) CodeIgniter 繁體中文討論區
     我有去問過蠢問題xd 但是在討論區也可以學到很多,別人有的問題幾乎我也有。

 3) 快快樂樂學 CodeIgniter (1) - 導論,很基礎的教學,還不錯。
     對,很基礎。

 4) codeigniter開發筆記
    這個也是入門級可看。

 5) An Introduction to Views & Templating in CodeIgniter
    英文資源,但很適合初學,有完整CRUD介紹,但要耐心看完。若能完整閱讀完會很有心
    得。

 7)大推!看過教學文件裡最明瞭的,有完整CRUD介紹。
      阿吉的網頁-使用 CodeIgniter 開發動態網站

 8)此部落格有很多關於ci的教學。
    小惡魔 – 電腦技術 – 工作筆記 – AppleBOY


2012年9月12日 星期三

如何看到自己html的Outliner(大綱)

-有條不紊的網頁的大綱對於SEO是很有幫助的,像寫企劃書的目錄一樣,可以讓用戶對於這個網站有很清楚的概覽。
-過去編輯html應該常使用h1~h6來編輯自己的網頁大鋼,即便不是使用h1~h2,也會用一些比較有別於div或span或p的標籤來顯示大鋼,如dl,dt,dd等;ul,li...等等。但過去的我並不是這樣,但我也忘記我以前怎麼做的了,自從看了這篇HTML大綱算法對結構的影響(<-很推薦),我覺得幫助很大。

工具在此請參考 :


0) HTML大綱算法對結構的影響

1) Chrome Web Store - HTML5 Outliner   作者:Dominykas Blyžė

2) http://gsnedders.html5.org/outliner/

但這個使用後會出現亂碼,建議不要先不要用中文貼過去,而使用英文。


2012年9月10日 星期一

沒有Loading用的gif圖檔嗎? 可使用 Ajaxload - Ajax loading gif generator

今天在網路上看到一個還不錯用的網站 http://ajaxload.info/
可自動產生gif的loading動畫
若download下來是一個gif動畫檔
可選擇 loading的效果樣式 等... 
-end 


2012年9月6日 星期四

C語言入門小筆記


*begin: 自從上個月從圖書館借了一本C語言的(C語言入門,丁國棟 編著)書,一直沒時間去注意它,直到最後一周才慢慢有時間去看他,但書都借了,抱持著我想我應該看一下才對得起自己的心情,看了兩個章節 ( 第一章:函數,第二章:順序結構程式設計 ) ,覺得...我很容易在型態的部分打轉(奧...好複雜阿><),雖然printf跟scanf很好理解,但在處理型態的地方,我覺得還是很需要經驗,另外,練習也是很重要的事, that'a all..... 希望我有機會再往第三章看下去...。

C語言特點


  • 具有高階語言易學易 用易 移植性。低階語言的執行效率高。
  • 所有函數裡面只能有一個main()函數,程式也只會從main()函數第一列開始到最後一列結束,不論main放在什麼位置,都是從main()開始執行。
  • 所有C都是由一個或多個陣列組成,C語言的基本單位是函數。
  • 嚴格區分大小寫
  • 註釋寫法為 /*我是註釋哈哈哈*/

格式化輸出函數=> printf()格式化輸入函數=> sacnf()
scanf("格式控制字串",位址表列);
例如: scanf("%d",&a); //鍵入一個整數
scanf()函數格式說明符號功能:
格式符號功能說明
%08進位整數
%x16進位整數
%f浮點數
%c單個字元
%d10進位整數
%u無符號十進位數
%e指數表示的實數
%s字串

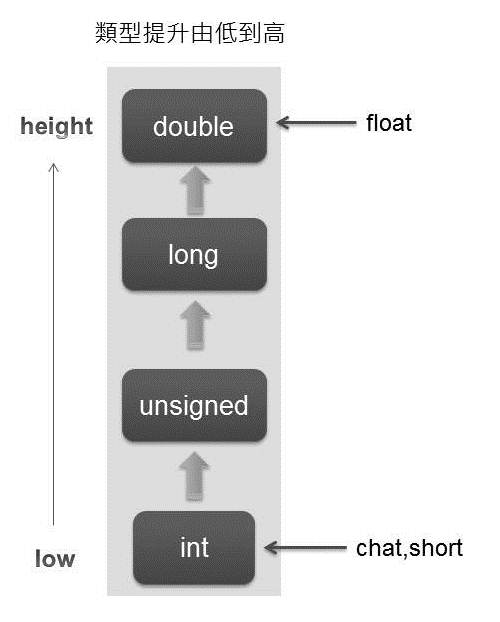
將數個不同型態的資料進行資料轉換時,必須將所有要被運算的資料轉成同一種型態,C有兩種轉換方式 1) 自動轉換 2)強制轉換,轉換原則為"類型提升",要將低的轉換到高的。


練習1:輸出我的名子
  
#include "stdio.h"
int main(){
 
 printf("i'm win\n");
 system("pause");
 return 0; 
}


練習2:計算體積的值

//求出體積。 
//已知體積為長寬高result = L*W*H 
#include "stdio.h"
int main()
{
 int L,W,H,result;
 printf("請輸入長寬高,並以逗號分開:");
 scanf("%d,%d,%d",&L,&W,&H);
 result = L*W*H;
 printf("計算結果%d\n",result);
 system("pause");
 return 0; 
}


練習3:計算BMI的值


#include
//BMI值計算公式:    BMI = 體重(公斤) / 身高2(公尺2)

int main(){
 float h,w; //設定初始值 
 
 printf("請輸入您的身高(公尺),體重(kg):");
 scanf("%f,%f",&h,&w);
 float rh = h*h;
 float mybmi;
 mybmi = w/rh;
 printf("你的BMI是 %f",mybmi);
 system("pause");
 return 0;

}


練習4:計算等差列數前N項的和 
#include
//計算等差列數前N項的和 
//s=a1*n + n*(n-1)*2;
int main(){
 int a1,n,d,s;
 printf("請輸入第一項,前n項,以及公差:");
 scanf("%d,%d,%d",&a1,&n,&d);
 s=a1*n+n*(n-1)*d/2;
 printf("第一項等於%d,前n項等於%d,公差為%d,結果為%d",a1,n,d,s);
 system("pause");
 return 0;
} 


end,  希望有朝一日邁向指標......
希望啦....  

2012年9月1日 星期六

Input元素的file屬性之accept在各瀏覽器的表現結果

前言:

先來談談Input的file屬性,通常我們所知的file欄位的html語法是這樣:
<input type="file" name="myfile" id="myfile" />
但,還有一個不錯的功能,那就是能指定這個file欄位可接受的附檔名,這個功能就是accept。accept屬性可接受指定的文件類型,內容可以填入檔案類型,如 : image/*等同於選取所有圖片類型;text/*等於所有文字檔格式,若要指定單一檔案格式,必須參考MIME Type。

用法如:

<input type="file" name="myfile" id="myfile" accept="image/*"/><!--只接受影像檔-->


<input type="file" name="myfile" id="myfile" accept="audio/*,video/*,image/*"/>
<!--只接受影像檔,影音檔-->

這樣看起來好像很方便,沒錯,對於嚴謹的網站來說,這真的很方便,尤其限制只能使用圖片檔,可以大大減少使用者傳錯不屬於圖片檔的附檔名。
但也有另一個缺點是,並不是所有的瀏覽器都能支援。


瀏覽器的支援程度:

IE和Safari瀏覽器不支持Accept屬性(目前來講是這樣),但其他瀏覽器雖然有支援,仍有弱點。


瀏覽器測試報告:

由於IE和Safari瀏覽器不支持Accept屬性,目前不做這兩種瀏覽器的測試,因為我做過測試了,好像真的not work。

accept內容 FireFoxchromeopera
accept="audio/*,video/*,image/*" 無作用 無作用 成功只選取audio/video/image類型
accept="image/*" 成功只選取image類型 成功只選取image類型 成功只選取image類型
accept="video/*" 成功只選取video類型 成功只選取所有video類型 成功只選取video類型
accept="text/*" 無作用 無作用 成功只選取text類型
accept="application/*" 無作用 無作用 成功只選取application類型
accept="image/gif,image/png
針對MIME_type選取檔案格式
無作用 只要大於一種,只會顯示"自訂檔" 成功只選取gif與png類型
accept="image/gif"
針對MIME_type選取只選取gif檔案格式
無作用 成功只出現gif檔案格式 成功只選取gif類型
accept="application/pdf"
針對MIME_type選取只選取pdf檔案格式
無作用 成功只出現pdf檔案格式 成功只選取pdf類型
accept="application/pdf,image/gif"
針對MIME_type選取只選取pdf與gif檔案格式
無作用 無作用 成功只選取pdf與gif類型


用你現在的瀏覽器,可測試 accept內容
accept="audio/*,video/*,image/*"
accept="image/*"
accept="video/*"
accept="text/*"
accept="application/*"
accept="image/gif,image/png
針對MIME_type選取檔案格式
accept="image/gif"
針對MIME_type選取只選取gif檔案格式
accept="application/pdf"
針對MIME_type選取只選取pdf檔案格式
accept="application/pdf,image/gif"
針對MIME_type選取只選取pdf與gif檔案格式

瀏覽器測試結論:


  • accept屬性的表現結果在opera完全作用
  • 同時設定只接受image/*(所有圖片格式)跟application/(所有文件格式)*=>瀏覽器只讀取image/*(只select圖片類型,忽略application)
  • 只設定application/* =>除了opera有特地列出所有的application之外,在其他瀏覽器等同於所有檔案類型
  • 針對MIME_type的選取方式,大於一種就只會出現自訂檔
  • 限制檔案格式只有以下瀏覽器支援( supported by Opera 11+, Chrome 16+ and Firefox 9+ only.)


建議:


  • 即使可以使用accpet屬性來限制上傳檔的檔案類型,但請勿使用這個方法來做為檔案的驗證,若要做驗證還是在server做比較好。
  • 可使用javascript來檔副檔名,但若使用者關掉瀏覽器的javascript等同於無作用。


Vue multiselect set autofocus and tinymce set autofocus

要在畫面一進來 focus multiselect 的方式: 參考: https://jsfiddle.net/shentao/mnphdt2g/ 主要就是在 multiselect 的 tag 加上 ref (例如: my_multiselect), 另外在 mounted...